In this world, no tutorial shows you how to draw infinite types of eyes. Every slight difference in the physical shape of the eye requires dwarf detail to draw that type of eye. Human beauty is that we all are different in our unique ways.
As I told you, you cannot draw infinite types of eyes but learn the basics of drawing a realistic eye. People even some artists find drawing an eye tricky! But drawing an eye is quite simple. In this tutorial, you see the actual way to draw realistic eyes.
SOME IMPORTANT TIPS TO DRAW REALISTIC EYES
- When ready to start your eye drawing, always begin with an overall eye sketch, to prevent disproportions,
- The second important tip is never to press your pencil hard. Always use light blows so you can erase them later.
- There should always be a soft and steady transition between shades.
- As you know, the eye is a three-dimensional thing. It is present deep in the eye socket. So always darken the shadows to vibrant their roundness.
- When drawing an eye, use the whole spectrum of shades.
- To improve your eye drawing, look at them more often. As you know eyes vary in shape, size, and color. That’s why you need to focus more on eye shapes. Take a mirror and study your own eyes. The more you focus on the types of eyes the more you know the things that surprise you!
STEPS TO DRAW REALISTIC EYES
Drawing a realistic eye is easy even for beginners. The key to perfection is practice. But it doesn’t even take practice as you would think. If you want to be a perfectionist, you only need patience with practice. Perfection is all about attention to detail. For your dream of becoming a perfect artist or to be perfect in drawing a realistic eye, you have to take your time to notice the tiniest shapes and shades of things. Here in this tutorial, I’m ready to help you. Let's continue our journey to draw a realistic eye together.BEFORE YOU STARTING DRAWING
Do these before your drawing- choose a reference photo
- collect the tools you need for drawing.
Choosing a reference photo is crucial for your drawing tutorial. It helps you to prevent distractions.
THE TOOLS YOU NEED FOR DRAWING
THE TOOLS YOU NEED FOR DRAWING
Before drawing choose the tools you need. Traditionally we use sketchbooks or drawing paper. The special types of pencils and erasers.
I recommend you take the following
I recommend you take the following
- A good quality paper: You can either use our sketchbooks for drawings. But if you want to create an outstanding drawing, I suggest you take a good quality paper.
- 4B and 6B Pencils: These pencils are good for drawings and shading.
- Blending stumps: Of Course for blending.
- kneaded eraser: It is the most important tool for drawing. It is used by artists for their stunning shapes and shades. It can be molded in any shape.
- Pencil and pen: Pencil eraser for its convenience and pen eraser for the finest lines.
Now to the actual tutorial
HOW TO DRAW EYE STEP-BY-STEP
Step number 1. Analyzing the structure of the eye
Before diving into the world of drawing realistic eyes, take the time to study the anatomy of the eye. Understand the basic structure including the pupil, iris, eyelids, and eyelashes. This will help in focusing on anything. By analyzing the structure of the eye, you will be able to draw the eye more realistic.Step number 2. circle
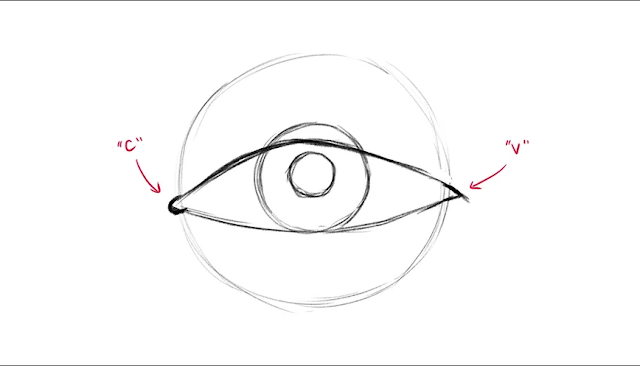
In this tutorial, we draw our left eye. First starting from a rough stage then moving to the cleanup stage. Let's draw a circle. Keep in mind that it's called eyeball not just a circle. We need to be thinking in a 3D space so we need to remember that eyes are spheres. Our eyelids curve around the eyeball, so it’s much easier to draw the full eyeball first before we add on the rest of the elements. But make sure you draw this lightly -- it’ll be erased later!
Step number 3: Drawing the main part iris of the eye
Now, focus on the elements of the eye. First, draw the parts approximately, and pay attention to the reference photo. Make sure to make proportions closely related to the reference photo. Draw two more smaller circles within your first large circle. This will be your iris (the part of your eye that has the color) and your pupil (the lens, hole, or black part)! What you should have now is an eyeball with no lids, but don’t worry, we’ll get to those in the next step!Step number 4 Draw the eyelids
The next step is drawing the eyelids with the iris. Make sure your eyelids are the same length as your initial circle. In a relaxed eye, your top lid should cover a little bit of the iris, and the peaks of your eyelids shouldn’t be in the exact same place! The top lid’s peak should be closer to the inner eye, and the bottom lid’s peak should be closer to the outer eye. The bottom eyelid is also straighter, and the top eyelid is more curved.Step number 5 Draw the corner of the Eye
These aren't the shapes. Draw the inner corner like the letter "C" and the outer corner should be a sideways "V" and a lowercase "y". Make sure that the top lid overlaps the bottom lid!
Step number 6 Erase the circle of the eye and add your eyelid ridges
It's time to erase the initial circle. In the circle place, you can add the upper lid ridge and a lower one. Make sure, the lower lid is a little closer to the eye than the top one. Here is a point that it's usually used to make tired eyes so you can skip this step if you'd likeFill your pupil completely black and mark the places where you want to make reflections in your eye drawing. It is crucial to indicate their intended locations because once you draw over the areas you want the eye shine to go, it can be challenging to remove the iris' shading or coloring!
Step 8 Add shading in your eye drawing
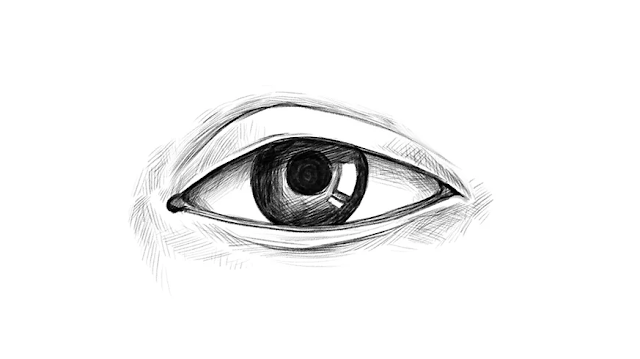
It's time to add shadows to your drawing. A more realistic impression can be achieved by shading the iris in a circle that becomes lighter towards the center. Be careful not to color in the area you designated for the eye shine! You should only cast shadows beneath the upper lid, not around the entire eye!
💡pro tip: Start by shading lightly and getting darker slowly, adding more details as you add more layers. Don't press your pencil harshly, put pressure with time when getting your drawing darker. It helps you to recover quickly if you make any mistake because it's not easy to erase.
Step 9 Shade around the eyes
To give the impression that your eye belongs on a face, add some shade around the eye as well! Shadows should be seen under the eyes, around the corners of the eyes, and around the eyelids. Cross-hatching is the shading method used in the sample. It involves creating shadows with a lot of tiny, crossed lines. Though softer shading approaches to look a little more realistic, feel free to use any shading technique you prefer!
Step 10 add lashes to your eye drawing
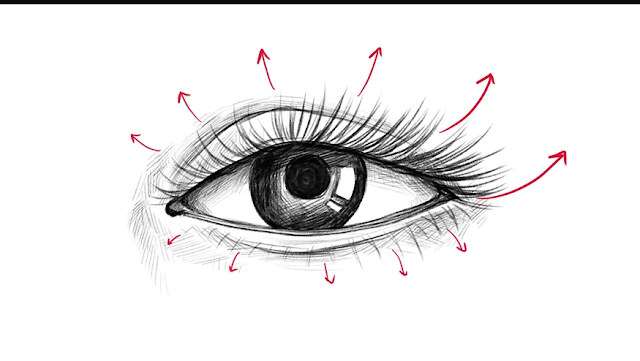
Make an effort to have a lot of variation in your lashes! They should begin fairly thin in the vicinity of the inner corners of the eye and thicken as you proceed toward the outer corners. Ensure the lashes are fanned out rather than falling out of the eyes.
There you have it, then! Even though the processes can seem straightforward, accuracy still requires experience. Therefore, do not worry if it is not flawless the first time! If you put in consistent effort, you will consistently produce stunning eyes!
Strategy to become an artist of drawing a realistic eye
- Study Anatomy
- Use reference photos
- Start with a light sketch
- focus on the iris and pupil
- Add depth with shading
- Highlight the reflection
- Detail the Eyelids and Eyelashes
- Blend smoothly and add texture
- practice regularly
This will boost your understanding and increase your artistic skills.
also, learn how to draw anything
Conclusion
Drawing a realistic drawing requires a lot of patience, observation, and practice. you can develop the skills needed to create a lifelike and expressive eye in your artwork by studying anatomy, using references, and practicing regularly.
In this article, I told you everything about the tips and tools needed for a realistic eye. Hope you enjoy drawing a realistic eye with me. Thank You!also, learn how to draw anything


0 Comments