
Welcome to art skill share Discover drawing tutorials, sketchbook challenges, and courses on our site. Let's dive into a step-by-step guide on how to draw a hummingbird with a great focus on animals.
When learning how to draw a hummingbird, this bone is easy as the body bodies and tail are all kept to enough simple shapes.
My Inspiration Behind Drawing a Hummingbird
I was sitting in my garden and enjoying a quiet afternoon with tea. The air was filled with the lovely smell of blossoming flowers and the soft buzz of bees created a soothing background. My attention was suddenly drawn to a flash of iridescent green. It was a hummingbird, sitting near my roses in the garden. Its delicate beauty and incredible speed at which its wing fluttered captivated me.
As an artist, the time stopped to allow me to appreciate the beauty of this tiny creature. Its long, thin beak guzzles nectar from blossom to flower. I was captivated by the hummingbird's vivid color and quick motions. My inner artist forced me to capture its elegance with its innocence on paper. So, I'm here to share how to draw a hummingbird step-by-step with you. I hope you love and enjoy this drawing tutorial. So, let's begin.

The fun comes when it’s time to color in the neck and beautiful candescent external fleece. still, guess again, If you suppose you need redundant fancy inventories to make some veritably bright hummingbird colors. You can always use crayons to color( like a dark green over a light green) to add some redundant visual texture,( one of the rudiments of Art!). It’s subtle, but surely there, as the crayons will no longer completely mix like oil painting aquarelles. You can indeed add some red color over the pink to make the flower look redundant and vibrant. How important do you know about hummingbirds?
Then are a many data that might surprise you about this amazing little raspberry.
Hummingbirds are the lowest migrating raspberry except they don’t resettle in flocks like other species. Some indeed trip alone for over 500 long hauls at a time. Hummingbirds are the only catcalls that can fly backward. Hummingbirds have no sense of smell. While they can’t whiff out affluents, they do have good color vision.
In this drawing lesson, we'll tackle sketching a hummingbird in flight seen from the side. Despite the complexity, we'll use simple shapes to construct the drawing.
Let's kick things off:
THINGS NEED FOR DRAWING
- GOOD QUALITY PAPER: the basic need for drawing is good quality paper. You can also buy a sketchbook
- pencils: 2b and 6b
- crayons: the large pack is best for more color choice
- black markers for drawing the outline
Step 1 - Draw Shapesfor the Head, Neck, And Torso of the hummingbird
Start by outlining the head, neck, and torso. Begin with an oval for the head, followed by a curved line for the neck extending from it. Add another shape below for the torso.
Step 2 - Draw the Tail, Beak, and Eye Shape of the Hummingbird
Proceed by defining the main body shape with the tail, beak, and eye placed.

 `
`


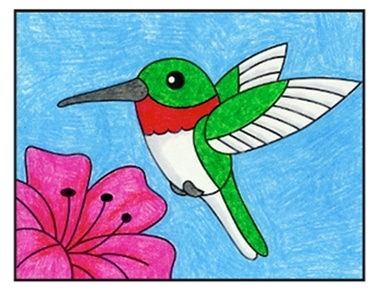
The last part to bring life to your drawing is adding a flower and beautiful pink and red crayon colors. Try to capture your Imagination.
Step 3 - Draw The Wing of a Hummingbird
Time to draw the wing. The hummingbird's wings are notably long compared to its body length. Remember to position it slightly above the head and closer to the lower midpoint of the torso.`Step 4 - Draw The Talons and Additional Details of Your Hummingbird
Include talons under the body, detail for beak alignment, and a curved line on the tail feather for shadow effect.Step 5 - Add The Details to the Wing Of the Hummingbird
Enhance details on the wing feathers by meticulously observing their shapes and contours.
Step 6 - Add Patterns Around the Eye And a Few segments on the Tail Feathers of the Hummingbird
Add subtle patterns around the eye, extra segments on tail feathers, and shadow underwing using hatching techniques.Step 7 - Finish Hummingbird Drawing By Adding Texture
Now we’re ready to finish the delineation. You may go over your pencil sketch with the essay to make the discrepancy stronger. However, be sure to allow the essay to dry fully before using an eraser to remove any remaining pencil marks, If you decide to go this route. With the essay, we’ll add a bit of texture and shadowing on the underpart of the body. setting and cross-hatching is used then to produce the vision of textural feathers while developing the form. We’ll also use the setting to darken the talons and the shadow under the tail feathers. Don’t forget the eye. We’ll use a bit of essay to darken the bulk of the eye but leave a small space open for a highlight. Conclude with texture accentuation through ink overlay providing contrast and depth to your hummingbird drawing.
STEP 8- ADD FLOWER AND COLORS
The last part to bring life to your drawing is adding a flower and beautiful pink and red crayon colors. Try to capture your Imagination.Conclusion
I hope you love this amazing creature that mesmerized me. It is truly an amazing and easy thing to draw a hummingbird step-by-step. If you have any questions or doubts feel free to comment below to contact me. I'm here to guide you!
Meet Khadija - Your guide at Artist Skillshare! An artist who finds joy in drawing and teaching others. Follow along for helpful tips and guidance on your artistic journey here!
I know you also enjoy and love how to draw sun
I know you also enjoy and love how to draw sun


0 Comments